Software: Adobe Premiere Pro
Version: 1.5
In this tutorial we will learn how to use Adobe Premiere Pro's Basic 3D video effect. Here's a sample video file that shows what we hope to achieve by the end of this exercise:
Let's begin by creating a folder named Basic_3D_Effect. You may place this folder anywhere on your hard drive.
Next, create a new Adobe Premiere Pro 1.5 project. Select the DV-NTSC Standard 32kHz Preset. Name your project Basic_3D_Effect and save it inside the Basic_3D_Effect folder you just created. Click on OK.

Next, create a new Title by choosing File > New > Title...
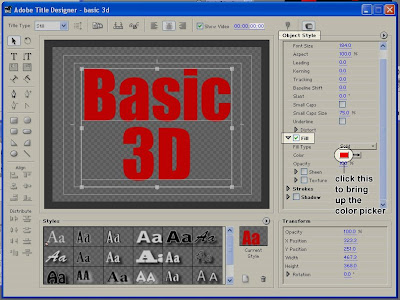
Using the Title designer's Type Tool, type in the words "Basic 3D". Type the word "Basic" on one line and type "3D" on the next line similar to the image below.

Use a big bold font and choose a color that isn't too bright. To change the color of your text, select it first, then go to the Object Style section of the Adobe Title Designer. Under the Fill properties, click on the color box to the right of the word Color. This will bring up the Color Picker window where you will be able to choose your desired color.

Save your Title file as basic_3D.prtl (make sure you save it in the Basic_3D_Effect folder as well) and close the Title Designer window.
From the Project window, drag the basic_3D title down to the video 1 track of your Timeline. You can zoom in on your Timeline in order to see the clip better. Make sure that the clip is about 5 seconds in duration.

continue to Working with Adobe Premiere Pro's Basic 3D Video Effect PART 2
No comments:
Post a Comment